
Hair accessories are a passion of mine. I grew up in South London among friends from many different cultures and backgrounds. Hair was important to all of my friends, but we all had different challenges. Some friends had dry frizzy hair, some had uncontrollable curls, while I struggled with flat hair. I guess this created a sensitivity in me to the importance of hair as a cultural signifier and form of expression. How we style and dress our hair is as much of a statement as clothes and make-up we wear.
I chose to develop scrunchies because they are a hair styling essential that combines the expression of print design with the practicality of simple forms.
I make my scrunchies from silk because it's kind to all hair types and doesn’t tangle. It's also a fantastic material for digital printing, allowing for vibrant and tonal designs to really shine through.
I’m really excited about these new silk scrunchies. I usually make them using leftover fabric, but with Christmas close by and with the demand for scrunchies as gifts and stocking fillers ramping up, I thought I would produce them in a slightly different way. A lot of thought and effort goes into these products, so I’ve decided to give you all a sneak peek at my creative and production process.
Inspiration and design process.
My creative process always starts with nature. Here I've used watercolour paints and inks to create washed stripes that reference open and spacious landscapes, using deep colours and rich textures as a starting point. The way these colours bleed into each other is an effect that prints really well on silk.


I then scan my paintings into my computer, and working in Photoshop, I layer images on top of one another, experimenting with colour, scale and opacity features. Photoshop allows me to be playful with my designs, and gives me flexibility to explore many different directions, and go back several steps if I don't like the way a design is developing.

I've decided to go with this pattern.

After a lot of experimentation and refinement I end up with a final print design that can be put into repeat in preparation for printing onto silk.
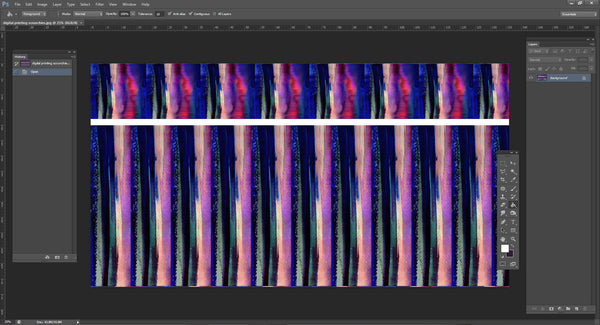
Now to create a file for the digital printers. The fabric is 136cm in width, so I need to create a design file 136cm wide and as long as required to make the number of scrunchies I need.
I know from making scrunchies in the past, that I need three times the length of silk fabric to elastic.
In the top row, you can see that I have simply positioned my design side by side. After seeing the file like this, I decided to get rid of the very washy section and keep the more striped element of the design. I've then stretched the design file to create the exact length I need to make my scrunchies. You can see that the width of my design file is 136cm, to match the fabric width which will be fed through the digital printer.
The next step is to find a suitable fabric for printing my design. After flicking through the samples (here I use Silk Bureau) I decide to use silk habotai. This fabric has a lovely soft finish and is tightly woven so I know it will take the fine definition in my design well. It's also got the perfect weight that will puff up well in my scrunchies, while being opaque enough to hide the elastic inside.

A couple of weeks later, and my printed silk fabric has arrived, ready to be cut to size for making the scrunchies. I personally don't do my sewing anymore as I've found amazing local seamstresses who do a far better job than me, and it means I can concentrate on designing and developing new products. For this batch I sent my fabric to the very talented Tula Leanne.

Ta-daa! Here's the finished product. I love how soft and pouffy it is.


So there you have it. A little look behind the scenes at how I go from concept, to design, to final product.
Please do have a look at my silk scrunchie range and if you have any questions, feel free to comment or send me an email.

Leave a comment